Thursday 17 December 2020

Rosette Nebula Revisited

With unexpected clear skies last night, I decided to have a 'proper' go at imaging the Rosette Nebula which has the NGC 2244 star cluster at its core. Things didn't quite go to plan as I made a mistake with my intervalometer and so wasted an hour of imaging time, but I did manage to get something out of the evening. Here is the equipment and acquisition data along with the resulting image:

Equipment used:
  • SkyWatcher EvoStar 80D with Skywatcher 0.85x focal reducer
  • Canon 800D modded for Ha sensitivity
  • Optolong L-eNhance narrowband filter
  • MGEN-II standalone autoguider on 9x50mm SkyWatcher finder scope
  • SkyWatcher HEQ5 Pro mount with belt mod
Acquisition details:
  • 7 x 5 minute subs with similar dark, flat and bias calibration frames.
  • Processed in Siril followed by Adobe PhotoShop CC

As you can see, I've added my GeekTeacher Astro signature logo to this image.

Saturday 5 December 2020

Set the Controls for the Heart of the Sun

Today I have been mainly photographing an International Space Station's Solar Transit.  This is when the ISS passes across the face of the sun creating a silhouette of its shape.  Whether you can view a solar transit like this depends on where you are on earth at the time of its passing.  Luckily, today it was viewable from some parts of the UK.


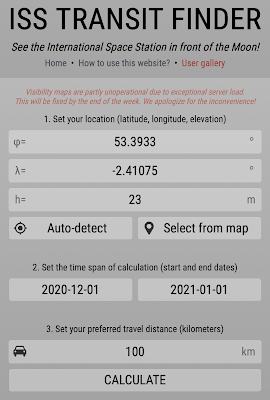
To view a transit you need to plan in terms of location and time, prepare your equipment and execute your plan at exactly the right time.  Finding out where it will be viewable is quite easy nowadays using online resources. I use ISS Transit Finder to look out for and plan solar and lunar transits by the ISS. Here is an outline of the procedure:

Planning

  1. Go to transitfinder.com
  2. Enter your location by using 'Auto-detect' or by entering your latitude and longitude co-ordinates
  3. Enter the dates in which you are interested - you can only go up to 30 days in advance
  4. Enter how far you would be willing to travel in km (100 is good number to choose)
  5. Click the 'Calculate' button.

This will take you to a screen that shows you the next solar and lunar transits which can be viewed from or near your location, in date order.

From the above image it can be seen that when I was planning this, the next solar transit was 2020-12-05 (US date format) which is today. However, the quality of view was only going to be 2 star from where I live in Tyldesley with only 1.21 seconds of viewing time and the ISS is only just skirting the bottom of the sun. Clicking on the 'MORE INFORMATION' button revealed more detail:

Clicking on 'SHOW ON MAP' produces a map of the transit path showing my location as a red pin and an ideal location on the line of maximum viewing time with a green pin.

Anywhere along the central line would give a viewing of 2.37 seconds.  So I closed the pop up box and zoomed into the map to find a good spot.  It was at this point that my friend Paul Richardson suggested Dunham Massey, as it's an area not far from our homes and almost exactly on the central line.  He suggested a free car park on Henshaw Lane, but when I actually got there it wasn't in the best position. However, I soon found another spot just 100 metres up the road and Paul joined me there.

Preparation

The preparation to get an image of the solar transit mainly requires a lot of thought.  There are two main methods I considered:

  1. Fire a rapid burst at exactly the right time
  2. Take some video of the passing
Having two DSLR cameras, I decided to try both methods.

The first method depends on having the right camera settings and firing a burst exactly on time. Luckily, I've imaged the sun a few times now, the first time being capturing the Transit of Mercury back in November 2019 - you can read about that here.  So I had an idea about the settings, although clouds can sometimes play havoc with what you think should be correct.  I set the camera to fully manual mode, and used ISO 100, an aperture of f/9 and a shutter speed of 1/1000th of second and practised in my back garden.

The second method doesn't require exact timing as the video can be started early and left running.  Although you will be sure of capturing it that way, the resulting images may not be as sharp for such a small, fast moving object. A high frame rate and fast shutter speed would be needed.

To help with timing, I downloaded an accurate time app for my phone called 'Atomic Clock' which is synced to internet time and which gives the time in milliseconds.  My shutter release cable and two home-made solar filters made for the Mercury Transit were also needed. The shutter release cable helps avoid unwanted vibrations often caused by touching the camera. 

The solar filters are essential for viewing the sun to avoid damaging your eyes and the camera sensor.  You can read how I made mine here. I never look at the sun though the eyepiece, only on the back screen of the camera.  It also helps to use a towel or sheet placed over the camera and your head when viewing the camera screen, to cut out unwanted light from the sun.

I decided I'd set up two cameras on tripods each with a solar filter (one for video and one for stills) to ensure I got some record of the transit.  I'd start the video recording early and leave it running, then concentrating only on the stills camera which I would fire a three second burst activated by the shutter release cable.  My camera, a Nikon D500, has a large RAW file buffer and can shoot up to 200 continuous frames at 10 frames per second, although there is somethings a brief pause after 50 frames. I used a 500mm f/4 lens with a 2x teleconverter to give 1000mm (or 1500mm in 35mm terms).

Because the ISS was only going to be a tiny silhouette against the very bright sun, I decided that the shot I wanted was a composite of its path across the face of the sun. A single image like the one below isn't all that interesting. So all I'd need to do was hold the shutter down firing rapidly as it passed by - easier said than done and only one go at it!


Execution

Having done the preparation, the final part was to put the plan into action. I arrived early to cope with setting everything up correctly and doing a few test exposures. Paul turned up shortly afterwards and when we were both ready we just had to wait for the right time. Paul was shooting video though an 400mm scope with a 2xBarlow and a DSLR camera.

Anxiously checking the Atomic Clock app, I called out the time every now and then waiting for 13:16, at which point I held down my shutter release and fired away.  I carried on doing it for three button presses which took about 200 shots each until 13:17 arrived, at which point I knew it the ISS had gone. 
 
Before we knew it, it was all over.  We quickly checked the backs of our cameras but neither of us could see anything except the sun.  I thought I'd blown it. I'd have to wait until I got home to find out that I'd actually captured it!  I sent a text to Paul to tell him I had and that he should have something too.  He later confirmed that he had. Below is an animated GIF which I made from the individual frames.


Unfortunately, my video recording was very underwhelming as expected.  Having used my best equipment on the stills, I had to use a full frame camera on a 300mm lens plus a 1.7x teleconverter for the video.  Although I have captured something, it just wasn't long though to record the tiny ISS in any detail.


Processing

The final part of this little project was to produce a final image of the ISS transit shown below.  This was done by importing the images into PhotoShop via a script which loads them into an image stack, with many layers. Each layer was a different shot.  Although I selected 'attempt to align images in stack' when importing them, my first attempt at combining them using the Darken blend mode resulted in the sunspots being elongated as the sun tracked from left to right.  Funnily enough, the sun still looked round, but the sunspots looked awful.  I tried fudging it by cloning some of them out of the image, but it really didn't look good.


So I then had to painstakingly align each image manually, which I did by creating several ruler guide lines on the spots, before cropping and doing some final colour and sharpening edits.  This is the final image and I have to say I'm quite pleased with it.


Isn't it nice when a plan comes together?

PLEASE REMEMBER THAT YOU SHOULD NEVER LOOK AT THE SUN THROUGH ANY OPTICAL INSTRUMENTS INCLUDING CAMERAS, BINOCULARS AND TELESCOPES WITHOUT USING A PROPERLY CERTIFIED SOLAR FILTER.

SUNGLASSES AND WELDING GLASS DO NOT OFFER ADEQUATE PROTETCION.

Saturday 28 November 2020

Horsehead Nebula Revisited

I decided to have another got at processing my recent Horsehead Nebula shot with some help from Bob Stuart.  I think I prefer the last one.


Saturday 7 November 2020

Sunspot Activity in Solar Cycle 25

With the skies being cloudy at night for sometime now and, with the recent development of some decent solar activity, my thoughts turned to the sun this afternoon. I didn't give myself much time as it was rapidly going down behind the neighbouring houses, but I did manage to get a couple of shots of the current active region known as AR 2781

Sunspots are temporary solar phenomena which are regions of reduced surface temperature caused by concentrations of magnetic field flux that inhibit convection. They are darker than the surrounding areas and occur in a region called the photosphere. Whereas the photosphere has a temperature of 5,800 degrees Kelvin, sunspots have temperatures of about 3,800 degrees K. They look dark only in comparison with the brighter and hotter regions of the photosphere around them and they usually appear in pairs of opposite magnetic polarity as well as moving across the sun's surface.


The designation AR stands for Active Region and the sunspots shown in these photos are part of the current Solar Cycle 25. NASA had this to say on their website:

Solar Cycle 25 has begun. 

The Solar Cycle 25 Prediction Panel, an international group of experts co-sponsored by NASA and NOAA, announced that solar minimum occurred in December 2019, marking the start of a new solar cycle. Because our Sun is so variable, it can take months after the fact to declare this event. Scientists use sunspots to track solar cycle progress; the dark blotches on the Sun are associated with solar activity, often as the origins for giant explosions – such as solar flares or coronal mass ejections – which can spew light, energy, and solar material into space.

Here's a cropped version of the above photo to show the sunspots in a little more detail:


To take these shots I had to dig out the solar filter I made for the Transit of Mercury back in November 2019 when I began to take my interest in astronomy a lot more seriously. 

It's really important to never look at the sun without proper protection - this doesn't mean just wearing sunglasses or even using a welding mask.  It's very dangerous to look directly at the sun through binoculars, telescopes and cameras and solar filters are made of a very complex layered material which offers great protection.  Even then, I only ever view the sun by looking at an image on the back of my camera, never through the eyepiece.

The Baader AstroSolar Safety Film I used to make the filter renders the image as more or less white, and indeed, this is the true colour of the light coming from the sun.  The orange hues we see by eye are mainly due to dust in the atmosphere, although some specialised filters do give the images a deeper orange colour.  Here's a simulation of that created by simply increasing my camera's white balance control.

Friday 6 November 2020

A Rather Frustrating Night

Tonight was rather frustrating to say the least.  Buoyed up by taking the Rosette and Heart Nebulae a couple of nights ago, I decided to move my tripod mount to the other end of my garden in order to see some different targets than the ones I've been imaging recently - bad move!  

In my original position I'd got setting up down to just a few minutes as the tripod was level and it was already pointing at Polaris making polar alignment quick and easy each time.  Moving the tripod meant that I had to level and realign it and for some reason tonight it just didn't go smoothly.  I'm not even sure now if I was aligned on the Pole star!

That said, I did manage a half decent photo of NGC 281 - the PacMan Nebula in Cassiopeia.  It's not as good as either of my two previously nebulae shots as the stars are not completely round. But it was great to locate it and get something that resembled the target, despite the smoke from Bonfire Night part 2 and my neighbours' patio lights shining directly in my face.  I used the same exposure as last time, 7 minutes at ISO 800 with an l-eNhance narrowband filter on a crop sensor camera modded for infra-red light sensitivity.

After this I redid my polar alignment and things seemed to get worse!  Clouds were also starting to appear so I started rushing things and quickly went for B44, the famous Horsehead Nebula in Orion. I only had time to do one single shot and, whilst doing it, I managed to click the tripod resulting in the 'tadpoles' you can see in the image below.  In spite of all this, I was very pleased to see the horse's head pop out of the nebula as this was the first time I've ever seen it. This single record shot took quite a lot of processing to remove noise and make it acceptable for viewing. But don't worry, I'll be revisiting this one a few times this winter!

I finished the evening on a patch of cloud-free sky almost directly overhead and fortunately M45, the Pleiades in Taurus were showing quite well there.  I've never managed to bring out much of the nebulosity in this open star cluster, and the same was true of tonight. Another one to revisit methinks.

Tuesday 3 November 2020

First Light with my Astro-modded Camera and Narrowband Filter

My recent acquisition for doing astrophotography is a Canon 800D DSLR camera body which I had modified for astro work. Now I am a Nikon user and it pained me to buy a Canon camera, particularly when I have two older Nikon bodies which could have been used.  However, three factors influenced my decision to buy a Canon body. Firstly, it is ridiculously expensive to have a Nikon camera modified for astrophotography in the UK and very few places do it. Secondly, neither of my old Nikons have a swivel screen and I have found having this on my D500 invaluable.  But I'm not going to have that body modded as it's my main birding camera. Thirdly, I know several people who use this model of camera to good effect and it's still a current model.

The modification involves removing the infra red (IR) filter (which is fitted to most new cameras) in order to make it more sensitive to the Hydrogen Alpha (Ha) wavelengths of light.  Many deep sky objects emit Ha light and normal DSLRs find it difficult to image these wavelengths.

In addition, I recently bought an Optolong L-eNhance narrowband filter to cut out unwanted light-pollution from houses, street lights and the moon as well as improving the contrast of Ha emission nebulae.  But when I took some initial shots with it on my unmodified Nikon camera, I realised it wasn't going to work well.  So I ended up buying a second hand camera body to have modified for increased sensitivity.

This session was my first attempt at using both the filter and modded camera together, and I have to say I am pretty pleased with the results.

My first target was NGC 2244, the Rosette Nebula in the constellation of Monocerous near to Orion. Although the initial image didn't look like this, I could definitely see the red Ha light faintly on the back of the camera and processing it in PhotoShop CC brought out these details.  It is a single shot of 7 minutes duration at ISO 800 on an HEQ5 Pro tracking mount. I didn't use guiding and so the stars are amazingly round for this duration of shot.


Later I took this shot of IC 1805, the Heart Nebula in the constellation of Cassiopeia and, although I should have used a focal reducer to get the whole image in the frame, I am pleased with my first attempt. The exposure was the same for the Rosette Nebula as described above.


With these two successful targets under my belt I am now keen to get guiding going and do some stacked sets of shots to hopefully bring out more fine detail and perhaps some more colours.  I'll also be using a focal reducer on both of them next time.

Monday 2 November 2020

Another Labelled Moon Map

One of the things I really like doing is putting labels on my astro images, particularly the moon and constellations. This really helps me learn and remember these things and I fnd that many other people write positive comments about the labelling when I post in various Facebook groups.

So here's a labelled version of last night's waning gibbous moon:


Saturday 24 October 2020

Triangulum Galaxy Revisited

Here's my recent shot of the Triangulum Galaxy which has been reporeccesed by Bob Stuart to bring out a lot more detail.  He's a real astromagician!


The Triangulum Galaxy is a spiral galaxy 2.73 million light-years from Earth in the constellation Triangulum. It is catalogued as Messier 33 or NGC 598. The Triangulum Galaxy is the third-largest member of the Local Group of galaxies, behind the Milky Way and the Andromeda Galaxy. It is one of the most distant permanent objects that can be viewed with the naked eye.

The galaxy is the smallest spiral galaxy in the Local Group and is believed to be a satellite of the Andromeda Galaxy or on its rebound into the latter due to their interactions, velocities, and proximity to one another in the night sky. It also has an H II nucleus.

The Triangulum Galaxy

This is a spiral galaxy some 2.73 million light-years from Earth in the constellation of Triangulum from which it gets its name. It is catalogued as Messier 33, M33 or NGC 598 and it's the third-largest member of the Local Group of galaxies, behind the Milky Way and the Andromeda Galaxy. It's one of the most distant permanent objects that can be viewed with the naked eye.


This is probably the best Deep Sky object I have taken and processed myself from my back garden in Tyldesley. I decided to use my camera's built-in long exposure noise reduction feature instead of taking separate dark frames. Here are the acquisition details:
  • Unmodded Nikon D500 with handheld intervalometer
  • SkyWatcher 80 ED refractor telescope
  • HEQ5 Pro tracking mount
  • 25 light (image) frames of 90 seconds @ ISO 800
  • 25 flat and 25 bias calibration frames
  • Stacked in Deep Sky Stacker and processed in Adobe PhotoShop CC

Tuesday 20 October 2020

The Pleiades or Seven Sisters Asterism

The Pleiades or Messier 45 are an example of an open star cluster, a group of stars that were all born around the same time from a gigantic cloud of gas and dust. They are one of the most easily recognisable star patterns (sometimes known as an asterism) in the night sky, although whoever gave them their popular name of the 'Seven Sisters' clearly couldn't count! When you look at a photograph it's hard to discern which seven stars were originally the ones from which the name derives.


There are more than 800 middle-aged, hot B-type stars in the group which lies in the north-west of the constellation Taurus. Te hey are located about 440 light-years from Earth and are approximately 17.5 light years wide. The brightest stars in the cluster glow a hot blue and formed within the last 100 million years. They are extremely luminous and will burn out quickly, with life spans of only a few hundred million years, much shorter than the billions of years our own sun.

The name 'Seven Sisters' is derived from Greek legend. The Pleiades are the seven daughters of the Titan god Atlas and the ocean nymph Pleione. During an ancient war, Atlas rebelled against Zeus, the king of the gods, who sentenced his foe to forever hold up the heavens on his shoulders. The sisters were so sad that Zeus allowed them a place in the sky in order to be close to their father.

Monday 19 October 2020

Milky Way Revisited

Just revisiting some of my Milky Way shots from a recent trip to Islay in the Inner Hebrides. I was amazed by the light pollution from Northern Ireland which filled the bottom of many of my shots, so I decided to crop much of it out. This has made my Milky Way shots a lot shorter than I would like.

Here's a shot of the Cygnus region which includes my first visible image of the North American Nebula:


Here's a hand-labelled version of the same shot:


I used Astrometry.net to identify some of the stars and then the Stellarium desktop software to help me fill in some more details. Here's the output from Astronomy.net:


Here's the Stellarium view that I used:


This is a list of the main objects in my photograph as found by Astrometry.net:


And this diagram shows the area of sky at which I was looking:

Can You See What It Is Yet?

This is my first ever shot of Uranus - that's pronounced 'Your-an-us' to avoid any lewd jokes. 

Can you even see it?


Uranus is an Ice Giant planet and nearly four times larger than Earth. It has 27 known moons, most of which are named after literary characters. Like Saturn, Jupiter and Neptune, Uranus is a ringed planet.

It really is beyond the limits of my current equipment to get a shot any better than this, but it's still pleasing to be able to photograph it as it brings my total of planets photographed to six: Mercury, Venus, Mars, Jupiter, Saturn and Uranus. And all within a single year.

Saturday 17 October 2020

The Orion Nebula Reprocessed

I have a new found friend and astro-mentor called Bob Stuart, who I met this year via Facebook in one of the astronomy groups.  Bob very kindly agreed to process one of my shots early shots and since then we've often chatted online, taken part in Leigh Astro Society Zoom meetings and I even bought my MGEN-II standalone guider off him. 

Whenever I moan about the difficulties I'm having in processing shots Bob always wants to have a go at processing it for me - lovely chap! So here's his version of my recent Orion Nebula shot.  It took about three processed versions to het to this but I think you'll agree it's better than anything I've produced by myself.

One day I hope to be able to process all my own shots, but for now it's good to see that my equipment is capable of getting some decent results.

Monday 12 October 2020

The Orion Trapezium Revisited

To produce my recent Orion image I took some shots at only 1 and 5 seconds so that I might preserve some detail in the Trapezium stars of the core. I was pleased to see that I managed to capture the four largest core stars with some separation.


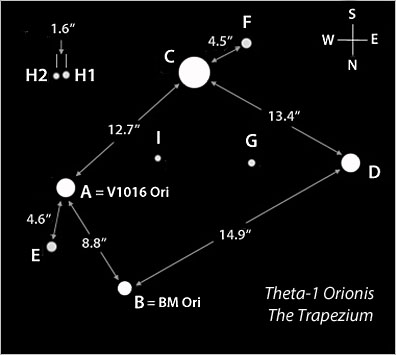
But Bob Stuart processed these stars even further to bring out more nebulosity and dust clouds and spotted that the A and C stars in the core (see diagram) had slight bulges on them. My DSLR and lenses couldn't resolve any better detail than this, but Bob believes them to be the much smaller E and F stars in the cluster (see diagram below), but I'm not sure.


Bob also suggests that the black spots close to the Trapezium may be proto-planetary discs, which are rotating discs of dense gas and dust surrounding a young newly formed star.

My photos need to be rotated to be compared with the diagram below - a rotated version is included at the bottom of this page.


Friday 2 October 2020

A Second Try at the Moon and Mars


A day later I thought I'd have another go at the (almost full) Moon and Mars conjunction, particularly as they were closer together.  There was still a fair amount of cloud about, but this gave some of my shots a bit of atmosphere.   Mars is that tiny orange dot you can see in the top left corner of each shot!


And finally, here's a bit of video of the same scene.  Watch as Mars and the Moon drift eerily from east to west across the cloudy sky.

Thursday 1 October 2020

The Moon and Mars in Conjunction - October 2020

October 2020 will have two full moons this year, the first being the Harvest Moon at the start of the month on 1 October and the second on Halloween, 31 October.  When this occurs, the second full moon is known as a  'Blue Moon' (nothing to do with its colour) and also 'Blood Mood', 'Sanguine Moon' or a 'Hunters Moon' - but more on than later, when it actually occurs.  For now, these names are all down to local folklore from various countries.

Along with the first Full Moon, Mars will be close to it as it gradually reaches opposition and so the aim here was to try and get the conjunction of Mars and the Moon in a single shot.  The weather was generally poor with a lot of cloud, but this actually helped in achieving an exposure which balanced out the Moon's brightness with Mars in the same frame.


I also tried a few shots of just the moon, but the cloud cover really didn't help the detail here.


I tried processing my shots in various ways, but none of them are really that successful.


Sunday 27 September 2020

International Space Station Fly Over

After being missing from our northern skies for a few months, the International Space Station (ISS) can now be seen again tracking west to east across the sky in our area.  I use an iPhone app called ISS Spotter to predict when the ISS will next be passing over and in which direction.

It seems that some people don't think it's possible for me to take shots like this, but I can assure you it is.  I use a Nikon D500 crop sensor camera with a Nikon 500mm f/4 lens and a Nikon 2x teleconverter.  The above shot is cropped to death and fortunately, with a bit of processing, the detail isn't too bad.  Here's what an uncropped version looks like (which actually might be better):


Here's a shot of the waxing gibbous moon that I also took: